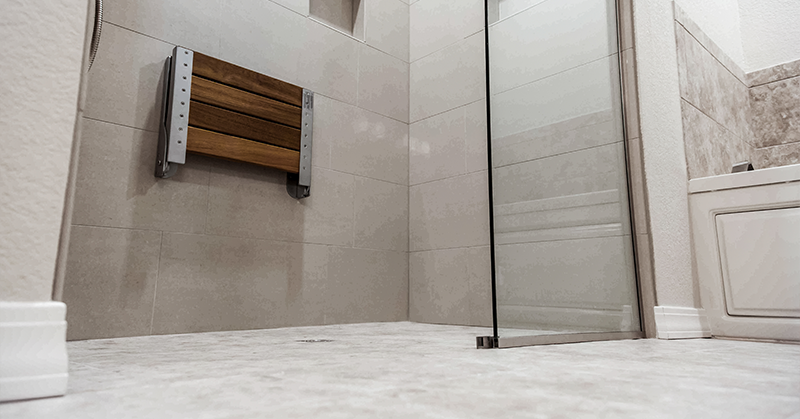
Our shower can become a dangerous place as we age. Nearly one in three injuries among elderly adults happens in the bathroom, most while showering or bathing. Traditional bathrooms have high-threshold tubs and getting in and out is one of the biggest challenges for someone who’s bound to a wheelchair or has any type of mobility issue. This creates some major safety issues for an older adult aging in place.
Today, I want to share some tips on how to tackle one of the most important aging in place modifications you can make to your loved one’s home – converting a tub and shower combo to a zero-threshold shower.
A zero-threshold shower eliminates a person’s need to step over a threshold to get into a bathtub. Just this modification alone makes bathroom safety skyrocket. Removing the shower’s threshold also requires the older adult to use less strength when getting in and out, and makes the shower wheelchair accessible.
The Good News…And the Bad News
Converting a tub and shower unit to a walk-in, zero-threshold shower is an upgrade that lends itself to aging in place design standards. The National Associations of Home Builders wants to see a minimum shower width of 36-inches. The good news is that the standard tub is 60-inches wide by 30-inches deep, give or take. This leaves plenty of room for a wheelchair and for someone to get in and out safely. And, this means the project doesn’t require you to move walls or make other major structural changes.
The bad news, however, is that converting a tub to a zero-threshold shower does require a good bit of plumbing and carpentry knowledge. You can quickly run into major water damage and drainage issues after your project is complete if the work isn’t done right.
If you’re a DIYer, especially a newbie, this one may be best left to a professional contractor. If you’re set on doing some of the work yourself, the first set of tips on the removal of the existing tub may be worth trying on your own. Unless you have experience with plumbing and carpentry, though, find a contractor you trust. You’ll save money in the long run.
First, Remove the Existing Tub and Shower Combo
Here are the tools you’ll need to have at the ready before you remove the existing tub.
Tools You’ll Need:
Plastic Wrap – use this as a temporary wall barrier to contain dust
Respirator – you’ll encounter a lot of dust when removing the wall of your tub and you do not want that stuff in your lungs!
Safety Glasses – like all renovation jobs, protect your eyes.
Tips for Removing the Old Tub and Shower Walls
Removing the old tub and shower is a relatively simple DIY project if you have the right tools and if you’re careful to not damage the studs and plumbing. Below are some tips for removing the old tub if you’re a DIYer.
Step 1: Turn Off the Water and Electricity
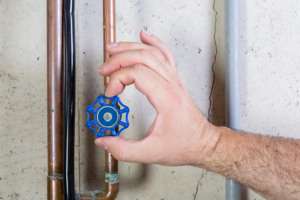
Find the main water valve in your home and turn it until the water is completely off. Then drain the water in the pipes by letting the faucets in the kitchen and bathroom run until the water stops trickling out. You’ll also need to stop any electrical currents running to the bathroom. Find the bathroom’s breaker in the electrical box and flip it off.
Pro Tip #1: Before you start work in the bathroom, cover the tub drain with duct tape. You don’t want any debris getting down into your drain while you work. This is an easy way to keep it clean and avoid creating more work for yourself down the line.
Pro Tip #2: Demolition is dusty! Do yourself – and the adult living in the home – a favor and tape off the bathroom with clear plastic wrap. This will contain the dust so it doesn’t find its way through the rest of the house.
Step 2: Remove the Overhead Shower Hardware

Next, remove the shower curtain rod. You should be able to easily remove this with your electric drill. The showerhead and shower arms are next.
Pro Tip #3: If you’re keeping the existing showerhead or shower arm, place a soft rag over the hardware between it and your wrench to avoid scratches or damage.
Step 3: Remove the Tub Faucet Hardware

Most standard tubs come with either a three-stem set-up or a single handle setup. However, your tub hardware is set up, remove the screws on each piece. From here you should be able to knock the handle away from the stem of each knob. Use a pair of pliers with some weight to them to tap on the knob to separate the two.
Once the knob is removed, you can remove the handle body. It should slip off of the handle’s stem pretty easily.
Next, you’re ready to remove each stem. Take your pliers and turn the base of each stem until it loosens and you can slide the stem out from the wall.
Repeat this same process for the tub spout if the spout is a stand-alone piece.
Step 4: Remove the Shower Walls

Most standard tub showers have a shower wall, called a shower surround, that sits lower than the ceiling. To remove the shower surround, take your pry bar and wedge it between the surround and the wall underneath until the surround breaks loose. At this point, you should be able to peel part of the surround off of the wall.
Next, use your reciprocating saw and cut along each corner of the surround to remove the remaining shower wall.
Step 5: Remove Any Drywall Hiding Underneath

If after removing the shower surround you see drywall or plaster rather than studs, you have one extra step to do before you move on. The good news is that removing the drywall isn’t difficult. There’s really no other way to do it than just hammering it to break the drywall up until it falls off. Before you start swinging, though, make sure you don’t hammer through the secondary wall. When the drywall is completely removed, you should see studs and the secondary wall.
Step 6: Remove the Tub
There are a few sub-steps to getting the tub fully removed from the bathroom.
First, plumbing.
- Disconnect any plumbing leading into the tub. The water in the house is turned off so you can go ahead and use your pliers to remove the connections.
- Then, disconnect the tub’s drain to the drainpipe in the house. This is as simple as turning the nut connecting the two pipes.
Second, framing.
- When the wall around the tub is removed, you’ll see the tub’s frame – a series of 2x4s around the basin. Use your saw to cut through the tub frame piece by piece.
Pro Tip #4: Your tub may also be connected to the frame using metal brackets. Either unscrew the tub from the metal brackets if they’re easily accessible. Or, just twist the tub as you pull it out to break the tub free.
Now that your tub is removed, you’re ready to transform the space into a zero-threshold shower.
The first step before you move on is to honestly assess your skill level for this project. I’ve said it before and I’ll say it again: any time you’re working on a home project that involves subfloors, plumbing, and drainage, you may want to spend the extra money and hire a professional. That’s because if any part of your project isn’t done precisely, you could end up with water damage or structural damage to your home.
If your skill level is higher than the average DIYer and you have experience with plumbing or structural renovations, then keep reading. I’ll walk you through how converting a tub to a standing, zero-threshold shower and provide you with some essential tips along the way to make the job easier.
Tools You’ll Need
Schluster KERDI-SHOWER-TS Curbless Shower Tray – a barrier-free shower pan or tray is going to make the job of leveling the shower floor much easier with less room for error.
Schluster Drain and Drain Pipe
Schluster Waterproof Shower Membrane
Laticrete Hydro Barrier – you’ll use this to waterproof the floor so you don’t have leakage issues
Fiberglass Reinforcing Mesh – you’ll install this with the Hydro Barrier
Paintbrush – you’ll use this to apply the Hydro Barrier
Trowel – used to spread and level the thin-set
Electric Drill with Counter-Sink Bit – if you’re cutting down the pan, you’ll need this bit to recess the screws into the shower pan
Circular Saw – you’ll use this to cut the shower pan
Liquid Nails Adhesive – you’ll use this to secure the new sister joists to the existing ones
Framing Nail Gun – this will also be used to secure the new sister joists to the existing joists under the sub-floor.
2x4s – you’ll use small sections to reinforce the sub-floor joists
Tips for Installing a Zero-Threshold Shower
Step 1: Plumbing
Before you begin converting a tub to a zero-threshold shower, verify that your plumbing is in place. If you’re in my neck of the woods or anywhere in South Florida, you’ll be installing your zero-threshold shower over a concrete slab. If you do need to reroute any plumbing under the slab and create a new sewer connection, I definitely recommend hiring an experienced plumber.
Step 2: Size the Shower Pan
It’s time to size the barrier-free shower pan to fit the shower floor. Confirm your shower’s length and width and mark the pan. Then, use your circular saw to cut the pan to size.
Step 3: Apply the Thin-Set & Install the Shower Pan
Apply a generous amount of the thin-set to the concrete floor and place the shower pan over top. It should fit snug with a thin layer between the pan and the slab floor.
Pro Tip #5: Once you set the shower pan down, walk on it to make sure it’s firmly in place and bonded to the floor.
Step 4: Waterproof
It’s critical that you get this next step right. Take your fabric and lay it against each of the bottom corners and sides. You’ll want to fold a 6-inch wide piece of the fabric so the seam of your fold fits into the space where the floor and walls meet.

Apply a thin layer of Hydro Barrier to each of the seams. To be safe, paint the waterproofing layer five inches up the wall and five inches along the shower floor. Once it dries, apply another thin layer followed by another layer of fabric on each of the seams. Finally, follow this same process in the corners.
Pro Tip #6: It’s important that you apply the fabric to a wet surface and that the fabric is tight against the seams. Add more waterproofing barrier if necessary to make the fabric stick and use your paintbrush to push the fabric in place.
Next, apply the waterproofing barrier to the shower floor getting right up to the drain. It’s okay if the Hydro Barrier overlaps the drain as long as it doesn’t go over the top of the screw holes.
The larger shower membrane fabric gets laid over the top of the water-proofed shower pan. Do this when the Hydro Barrier is still wet and smooth it out like you would a sheet on a bed to make sure it’s completely flat. Then, add another layer of waterproofing overtop.
Step 5: Install the Drain
You’ll have added fabric and waterproofed the area over the drainage hole. Once the waterproof barrier is dry, find the hole and cut through the fabric so the drainage hole is exposed. Then, just add your drain and screw it onto the drain body and secure it with the screws it came with. You should feel the screws stiffen as they enter the membrane and create a tight seal.
Pro Tip #7: Test the drain! Do yourself a favor and make sure the drain works before you start tiling. This can be as simple as plugging the drain and making sure your new shower holds water and then drains quickly and effortlessly when you unplug it. Check your township building codes, too. Some have requirements on shower drainage that are worth looking into.
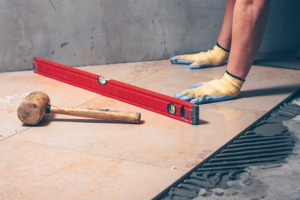
Step 6: Tile the Shower
Now, it’s time to tile. Always tile the shower floor first. Especially for aging in place showers, tiling the floor first will help make sure your floor stays level. Use your level to make sure the tile surface stays level as you go. Use your thin-set when laying the tile, wiping as you go to keep the tiles clean.
Step 7: Install Drain Cover, Doors and Hardware
You’re almost done! Once your tile and grout are set, add the drain plate over the drain hole and secure it in place with the screws it came with. Then, install the door and shower hardware, including showerhead and faucet knobs. You can check out this related article for my recommendations on the best bathroom faucet hardware before you buy. Follow the directions from the manufacturer for each of these installations for the best results.
As you can tell, there is a lot involved in converting a tub to a zero-threshold shower – more than you may have realized at the start. I can’t emphasize enough the importance of quality, professional work when you’re dealing with plumbing and structural elements of a home. If any of these steps seem out of your wheelhouse, contact a professional contractor.
If you do decide to handle this project yourself, don’t be a stranger! Use the comments section below and send me any questions you have along the way. Good luck with your next aging in place project.
Do you have pictures of tub to barrier free showers?