One of the biggest challenges I see time and time again in aging in place design is figuring out how to help someone safely move from room to room in their home. And, when that aging parent or friend relies on a wheelchair or faces other mobility issues, accessibility becomes an even greater challenge.
Modern homes and doorways just aren’t built to accommodate wheelchairs or walkers. Once you learn how to widen a doorway for aging in place, you’ll have the know-how to make a huge difference in the quality of life of your aging parent, friend or anyone else you’re helping.
How Wide is Wide Enough?
The National Association of Home Builders wants to see at least 32-inches of clear width across any interior doorway in aging in place design. At this width, your standard wheelchair, which is between 24-27-inches wide, can comfortably fit through.
This means, at minimum, you’re looking at a 36-inch door when you factor in room for the hinge and the door itself. Most standard residential doorways range from only 28 inches to 32 inches wide. So, you can see how widening doorways for aging in place is going to be a key component of your remodel.
As with a lot of things in life, sometimes the simplest solution is the right solution. You may be able to just remove the door in the doorway and gain enough width to make it accessible. Removing the trim around the door will add even slightly more width. This can be a great option for some doorways in the home. Obviously for other doorways though, like those that lead into a bedroom or bathroom, going door-less isn’t going to cut it.
For doorways that need more than a couple of inches of added wiggle room or where removing the door isn’t an option, you’re looking at a renovation project that’s pretty involved for the DIYer.
When you’re ready to widen doorways to make your home aging-in-place-ready, here’s what you need to know.
Step 1 – Prep the Doorway
Start every project with a clean work area. Throwdown a couple of drop cloths to protect the floor around the door. Otherwise, you’ll have to add refinishing your floors to your list of DIY projects to get to.
Step 2 – Remove the Existing Door and Trim
 Pop the door’s hinges and remove the door. It usually slides off fairly easily but a hammer or wood chisel and a little elbow grease may be what it takes.
Pro Tip #1: If you’re removing the old frame in a bathroom with wall tiles, be careful to not break or dislodge the tiles.
Step 3 – Remove the Molding
With the door gone, you can remove the molding that’s usually found around the existing doorway. It should pop off pretty easily as well.
Step 4 – Find Out What’s Behind the Wall
Once you’re left with just the door frame and the drywall surrounding it, you need to know what’s behind the wall – like electrical wires or plumbing – so you can safely avoid them.

A small 2”x2” cut out of the drywall should be enough. I just use a simple jab saw. That should be all you need to get through the drywall quickly with a clean cut. You need a hole big enough to get a flashlight through to spot wires, so open up the wall more as needed.
If you do find wiring…STOP. Don’t do anything else until you cut power to the wires. The easiest way to do this is to locate the corresponding breaker and cut power to that entire section of the home.
Pro Tip #2: Do NOT mess with the wiring in your home if you don’t have experience with electrical work. This is the time to call in a professional.
If you’re skilled enough to handle the electrical on your own, I’m sure I don’t have to tell you to double and triple-check that there’s no juice running through those wires with a voltmeter or multimeter after you cut power.
Step 5 – Time to Cut the Wall Board

Pro Tip #3: Level tools like this one with interior grips are the way to go! The grip helps you keep the level in place as you. Whoever designed this was tired of needing three hands to draw a straight line up and down a wall.
Then, just cut through the wall along your line from floor to ceiling. You want to cut the wallboard so it exposes the entire door frame with a couple of inches of buffer on both sides. You’ll know you’ve gone far enough when you see a set of Jack and King studs – these are the studs that support either side of the opening around the door.
Step 6 – Support the Header
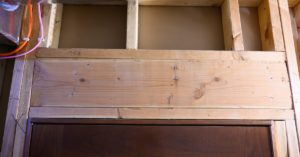 The next step is to start removing the existing door frame so you can widen the area. But Wait! If you’re widening a doorway that’s a part of a load-bearing wall, the header over that door is helping to support the main structure of the home. Removing it without properly supporting it first is going to cause issues.
So, before you remove the existing doorway, header or any studs, you’ll need to support the header and that load-bearing wall by building a temporary support wall. This will be your stand-in support system while you’re replacing the existing header.
Pro Tip #4: If the door you’re widening is attached to a load-bearing wall, it’s time to call in a professional. The risk of a structural issue is not worth the money you’ll save by widening the doorway on your own.
Step 7 – Remove the Studs…and Possibly Replace the Header
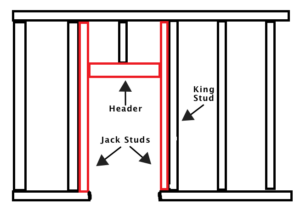 Once you remove the drywall and expose the inside of the wall that will open up into the new doorway, you’ll see those we talked about. The studs closest to the open doorway space are your jack studs. There may be one Jack stud or two. The studs beyond the Jack studs are your King studs. The next steps of the process here will depend on how wide you plan to make the new doorway and how that impacts your removal, or not, of both sets of studs.
Removing just the Jack studs:

This is less complex and requires a simple switch to a thinner Jack stud. Add a temporary support post under the header. Remove the Jack studs one at a time with a reciprocating saw. Then, install an “L” bracket flush with the King stud and the header. Then install each new, thinner Jack stud one at a time and remove the temporary support. By simply removing half the width of the current Jack stud you’ll open up the doorway a couple of inches on both sides. If this accomplishes a 36-inch wide doorway, the necessary width for aging in place, then this may be the best solution.
Removing both the Jack and King studs:
If removing just the Jack studs doesn’t give you the added width you need, you’re going to need to remove the King studs as well. This introduces the need for a wider header as well. Especially if the doorway’s header is load-bearing, you’re looking at a much more complex project.
Again, for most DIYers, it’s time at this stage to call a professional. Opening up a wall beyond the King studs has the potential to interfere with other wiring and plumbing throughout the house.
If you do decide to give this step a try, cut open the drywall on both sides beyond the King studs before you remove them. Once you cut, you’re committed.
Step 8 – Build A New Frame
Once your new header is up and you’ve widened the wall to the width you’re after (plus space on each side for trim), build a new frame around the doorway with new studs to support each side. I most often stick with the same sized studs that were a part of the original frame – usually 2x4s or 2x6s.
Modern residential building codes require there be 16 inches on center between studs. So, the amount of space you’ve added to the width of the doorway will dictate how many studs you’ll need to add.
Step 9 – If You’re Not Installing a New Door and The Doorway Will Be Open…
Install drywall to your frame opening, starting at the top and work your way down. Then, spackle any screws and finish with a good quality paint or other finish to match the rest of the wall.

Pro Tip #5: Something that’s easy to overlook when widening a doorway is how the larger open space will impact the areas around it – like the floor. Most flooring does NOT run under door frames. If you expose a previously closed doorway, think about what you’ll do with the floor around it before you start.
Step 10 – If You’re Adding A Door to the Doorway…
Hang your new, wider door frame in the opening and put up new drywall between the studs and the frame. Then, fill all nail holes with quality spackle, paint or otherwise finish the walls and add your trim.
The Bottom Line
Widening doorways, especially if you’re adding more than just a few inches of width, is a serious endeavor. Take care of your home by truly assessing your skill level and bring in a professional if any of these steps are beyond your experience.
As always, leave any questions in the comments section below or contact me if you have questions. And, good luck!